Balloon Animals – A Guide for Beginners

Balloon animals are usually made using long 260 modelling balloons (approximately 130 cm) and a few basic twists. For your first attempts, all you need is a balloon, a hand pump and simple instructions. Below, we show you how to make a balloon dog and mouse step by step, followed by a sword and a crown.
Types of Modelling Balloons
Balloon animals and other figures are made using long, narrow balloons designed for modelling. The instructions in this article use the 260/260Q format, with nominal dimensions of approximately 2″ × 60″. The 260 format works well for both simple figures and more elaborate designs.
You can find 260 modelling balloons (130 cm) in our range.
Essential Tools and Accessories
Before you start making your first balloon figures, prepare a few basic tools:
- Hand balloon pump – makes long balloons easier to inflate.
- Permanent marker – optional, for drawing eyes, noses and other details.
- Scissors – optional; when working with children, scissors should be used by an adult.
Balloon Modelling Safety
Remember: latex balloons and balloon fragments can pose a hazard to young children. Children under eight should use balloons under adult supervision. Keep uninflated balloons out of their reach and remove broken balloons and fragments immediately. A balloon pump is recommended for inflating 260 balloons. Anyone allergic to natural rubber latex should avoid contact with the product.
Basic Balloon Twisting Techniques
Before making your first figure, learn a few basic twists:
Basic Twist – pinch the balloon at the chosen point and twist the resulting bubble several times. Make subsequent twists in the same direction.
Ear Twist / Pinch Twist – make a small bubble, fold it so that its two ends sit next to each other, then twist it at the base.
Loop Twist – create a longer bubble, fold it into a loop and twist the two ends together at the base.
Lock Twist – make two bubbles, place them side by side and twist them together at the base to hold the structure in place.
These techniques are enough to make most of the simple figures shown below.
Easy Balloon Animals – Step-by-Step Instructions
How to Make a Balloon Dog
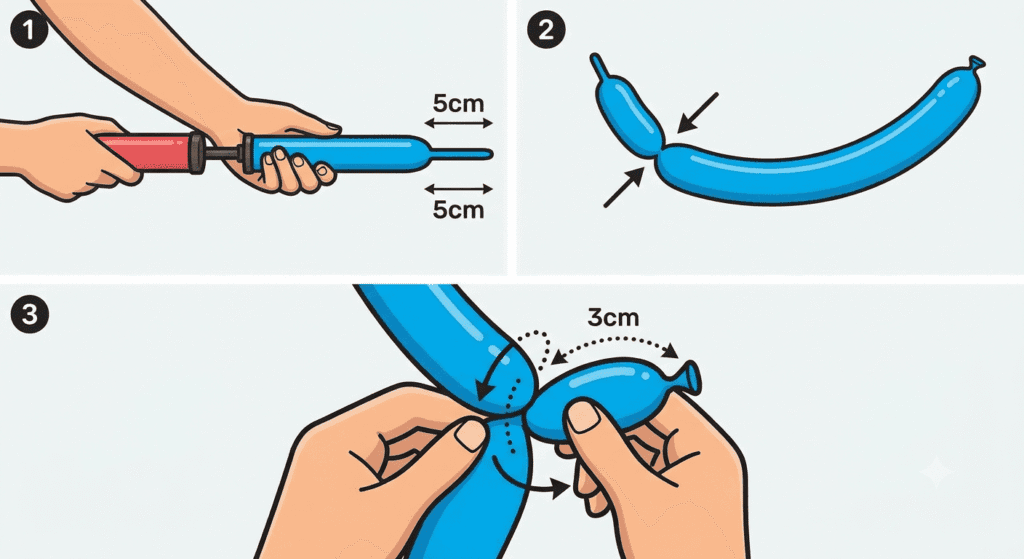
Step 1: Prepare the Balloon and Make the Dog’s Snout
First, prepare the balloon and make a small twist to form the dog’s snout.
Step 2: Head and Ears
Now we will shape the dog’s head by creating its distinctive ears.
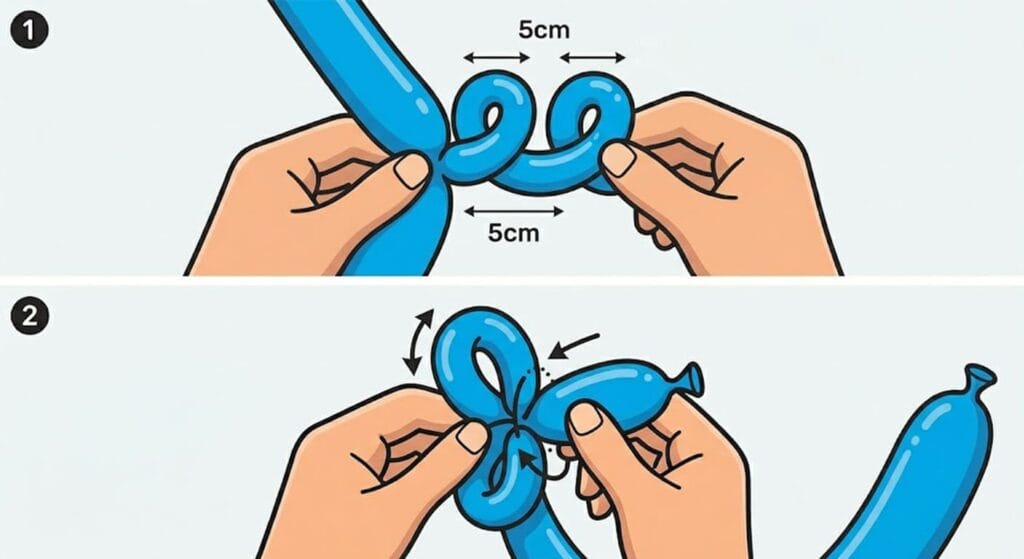
Stage 3: Neck and Front Legs
In this stage, we will give the balloon dog a neck and front legs.
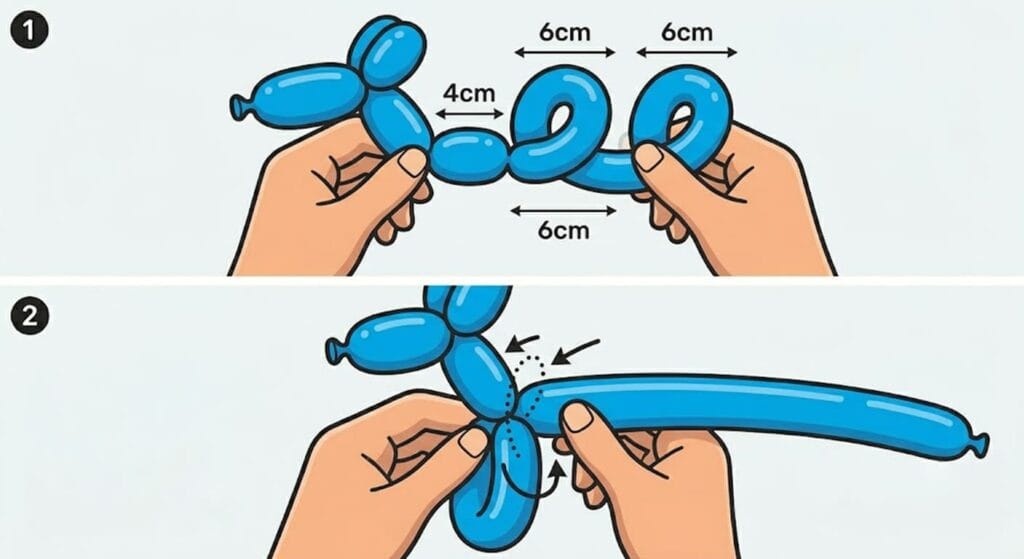
Stage 4: Body, Back Legs and Tail
In this final stage, we will complete the balloon dog’s body.
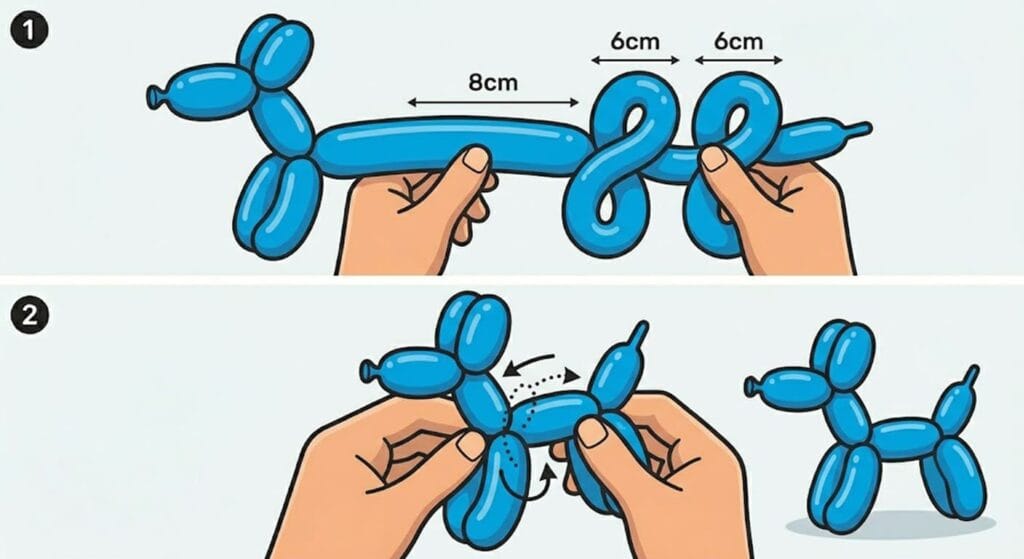
Balloon Mouse – Instructions
Step 1: Preparation and Snout
In this step, we will prepare the balloon and create the first small bubble for the snout.
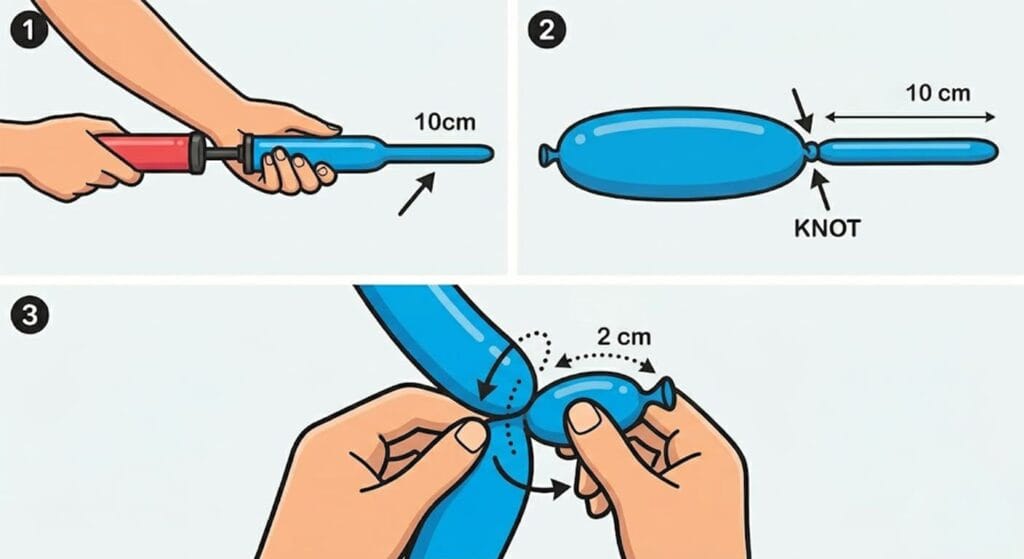
Step 1 (Inflating): Use a pump to inflate a long modeling balloon. Leave a significantly longer, approximately 10-centimeter, uninflated tail (as opposed to the 5 cm used for a dog). The arrow points to this long section.
Step 2 (Tying): Tie a knot at the end near the nozzle, leaving the long, uninflated tail on the right.
Step 3 (Snout): Hold the balloon near the knot and make a very small, approximately 2-centimeter twist (a bubble). This will be the mouse’s snout.
Stage 2: Head and Ears
Now we will make two larger twists, which will form the ears.
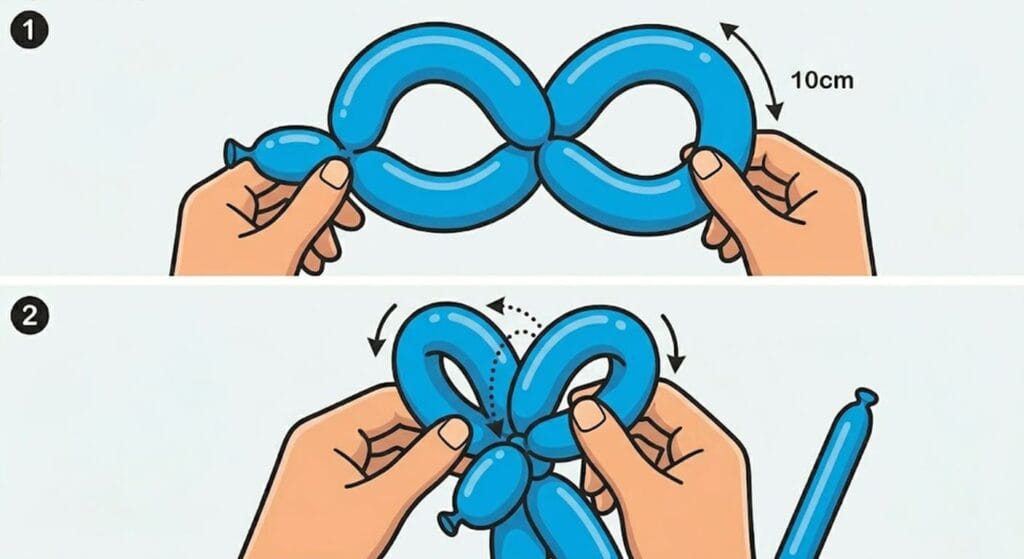
Step 1 (Twisting the Ears): After securing a small snout (2 cm), create two much larger, identical loops. Each loop should be approximately 10 cm long.
Step 2 (Securing the Head): Bring both loops (the ears) together. While holding them in place, perform a „lock twist” at their base, just behind the small snout. The arrows indicate the folding and twisting motions. This forms a head with a small snout and large ears.
Stage 3: Neck and Front Legs
In this stage, the mouse will gain a neck and tiny front limbs. A mouse has a more compact build than a dog.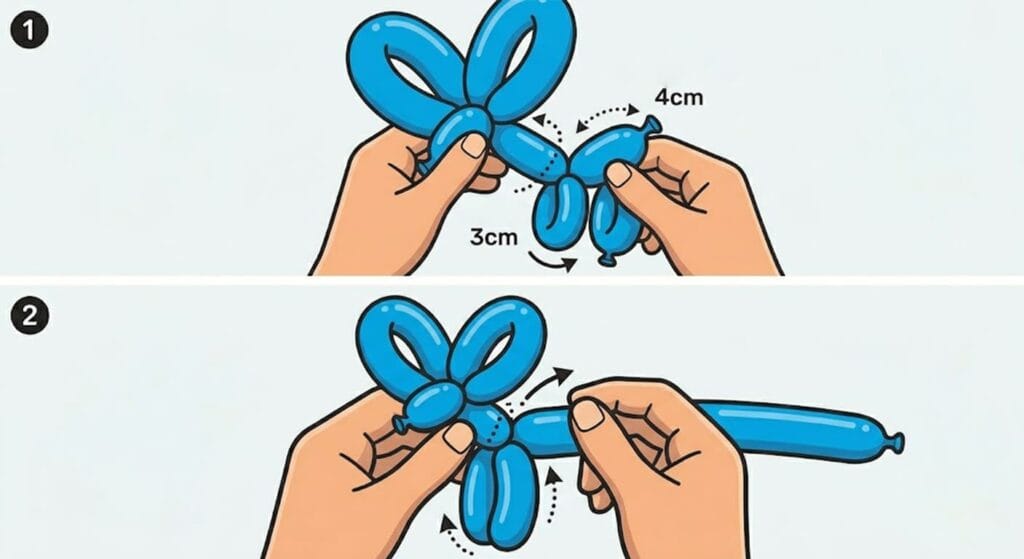
Step 1 (Twisting the Neck and Paws): Holding the completed head, create a very short bubble for the neck (approx. 3 cm). Immediately after that, make two identical, small loop twists for the paws (each approx. 4 cm long, smaller than those for a dog). Step 2 (Securing the Front): Fold these two small loops (the front paws) together and perform a lock twist at the base of the neck. The arrows indicate the folding and twisting motion. The front of the mouse is now complete: the head with its ears sits on a short neck, with tiny front paws. The long, uninflated tail remains visible on the right.
Stage 4: Short Torso, Hind Paws and a Long Tail
The final stage, in which we complete the body, while keeping a long tail.
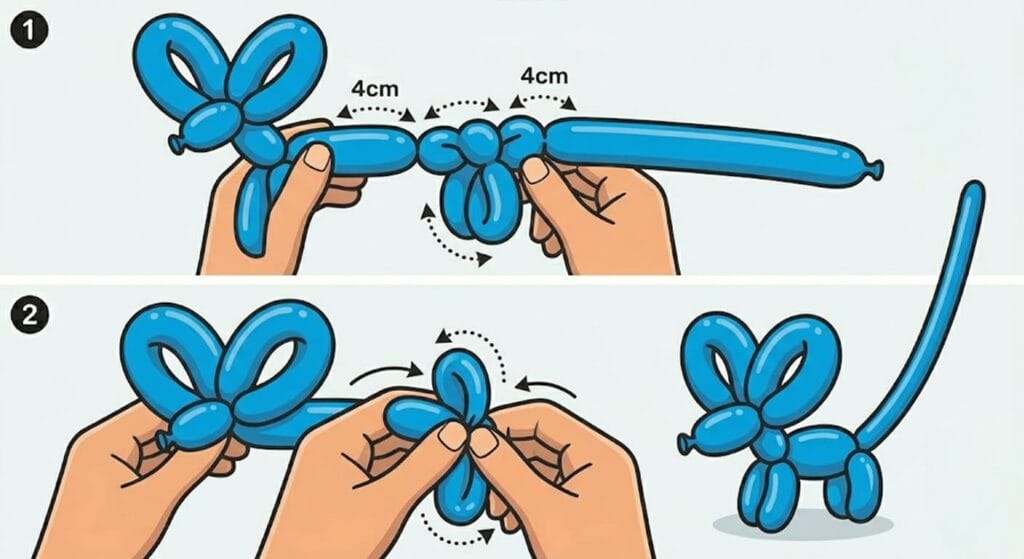
Step 1 (Twisting the Body and Hind Legs): Holding the front part of the mouse, make a short bubble for the body (approx. 4 cm). Immediately after it, create two identical, small loop twists for the hind legs (each approx. 4 cm long, the same as the front ones). The final, long section of the balloon remains long.
Step 2 (Securing the Rear and Finishing): Bring the two loops (hind legs) together and perform a final locking twist at the base of the body (between the body and the tail). Arrows …show the final moves.
More balloon figures, step by step: a sword and a crown
Have you already made your first few animals? Have you already made your first few animals? You can move on to the next two balloon sculptures made using 260-size balloons: a sword and a crown.- Balloon sword (saber) – very easy level, 1 balloon (260 size)
- Balloon crown – easy level, 1–2 balloons (260 size)
| Sculpture | Difficulty | Number of 260Q balloons |
|---|---|---|
| Sword / saber | ★☆☆ very easy | 1 |
| Crown | ★★☆ easy | 1–2 |
Balloon Sword (Saber) – Instructions
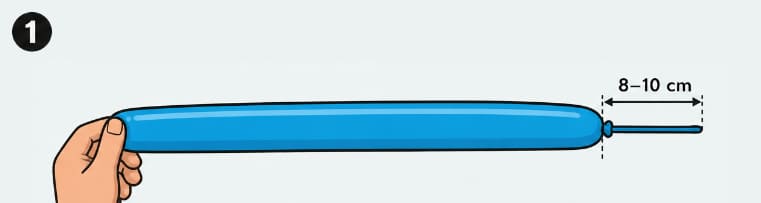
Stage 1: Preparing the balloon
First, we will prepare the modeling balloon. Inflating it correctly makes subsequent twisting easier and prevents excessive tension in the balloon. Step 1 (Inflating): Using a pump, inflate a 260-size modeling balloon, leaving about 8–10 cm (3–4 inches) uninflated at the end. This section provides space for the air to move into as you twist the balloon. Once inflated, tie a secure knot near the nozzle to prevent the air from escaping.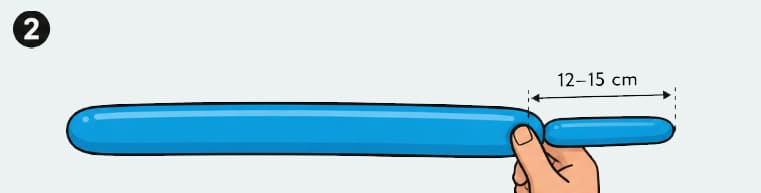
Step 2: Making the handle
Now, mark the spot where the sword’s handle will be. This determines how comfortable the finished figure is to hold. Measure out approximately 12–15 cm from the knot. This section will form the sword handle. Hold the balloon at the marked point and bend it slightly to prepare for making the handguard. Try to stick to the specified measurement—this ensures the sword is well-balanced and comfortable to hold.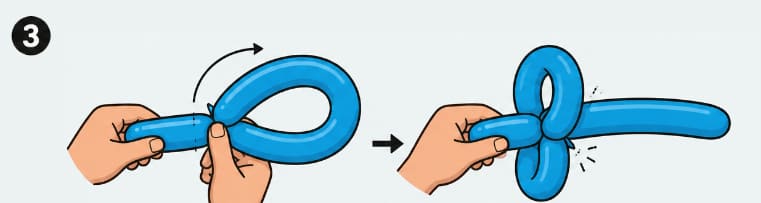
Stage 3: Creating the Guard (Hand Protection)
In this stage, you will create the characteristic guard—the element that separates the handle from the blade. At the previously marked spot, bend the balloon to form a large loop, approximately 15 cm long. Then, bring the end of the loop to the point where the handle ends and make 2–3 firm, locking twists. The twist should be secure so that the guard does not rotate during play. This loop will serve as a hand guard and give the sword its distinctive look.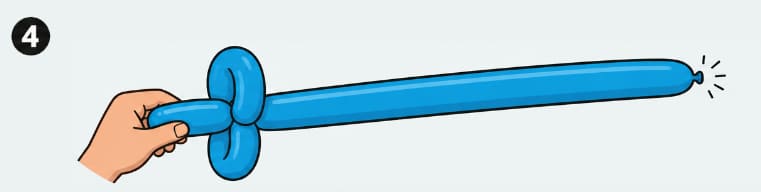
Stage 4: Finishing the sword
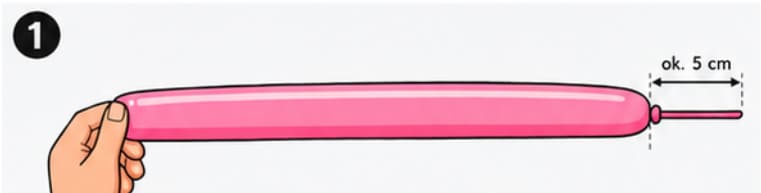
The remaining part of the balloon forms the blade. This is the final stage, in which the figure takes on its definitive shape. Straighten out the long section of the balloon located beyond the crossguard. This forms the blade of the sword. Check that all the twists are securely locked in place and that the hilt sits comfortably in your hand. If the balloon is slightly bent, gently straighten it out. Once the twists have been checked, the sword is complete. This figure can be used for entertainment activities and themed games.Balloon crown – instructions
Step 1: Preparing the balloon
Inflate the balloon to the desired length, leaving about 5 cm of slack at the end. Tie a secure knot so that the air does not escape while you continue working.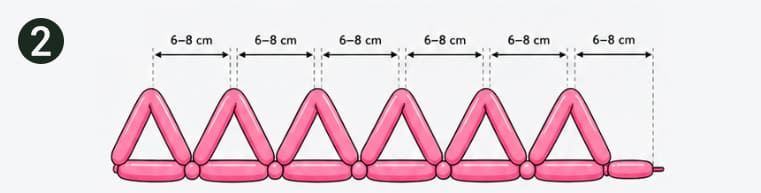
Stage 2: Creating triangles
Form triangles (bubble twists) right from the start. Grip the balloon at two points, spaced about 6–8 cm apart, and twist them together to create a triangle. Repeat this along the entire length of the balloon. This will result in a series of uniform triangles—these will form the points of the crown.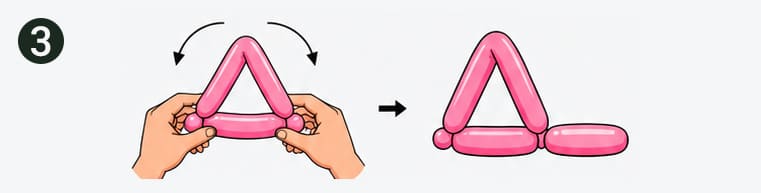
Step 3: Securing each triangle
Twist each triangle at the point where the bubbles meet at the base. This will keep the triangles stable and ensure the crown retains its shape.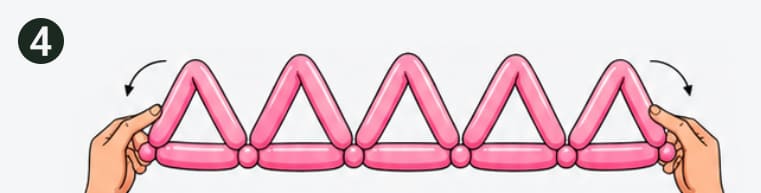
Stage 4: Forming the entire row
Once all the triangles have been made, gently shape the row by aligning all the points in a single line. Check that the triangles are all the same size.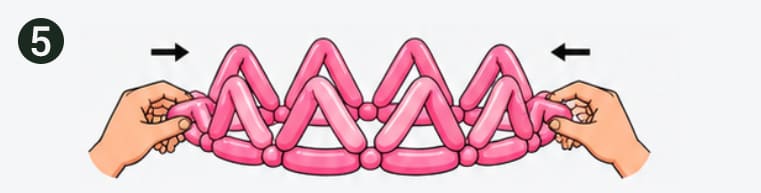
Step 5: Joining the ends into a hoop
Connect both ends of the balloon by twisting them together. Ensure the connection is secure and does not come undone. This will form a closed hoop.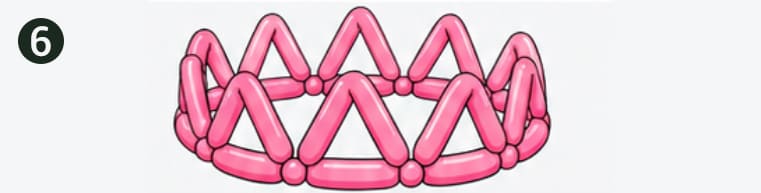
Stage 6: Adjusting the Fit
Gently stretch or compress the ring to fit the circumference of the head. The crown should stay in place while feeling comfortable. Tip: For a larger head, use two balloons joined into one circle. Tie the ends together, gently twist the two balloons together, then follow steps 2–6. This will give the crown a larger diameter.Common Beginner Mistakes and How to Avoid Them
Here are some common problems beginners encounter:-
Overinflating the balloon – balloon modelling requires an uninflated section that allows air to move along the balloon as you make additional twists.
-
Using balloons that are not designed for modelling – choose long 260 modelling balloons designed for repeated twisting and shaping.
-
Twisting successive sections in different directions – make successive twists in the same direction to help prevent them from untwisting. Qualatex also recommends twisting successive bubbles in the same direction.